5 Reasons to Start Training with Kettlebells

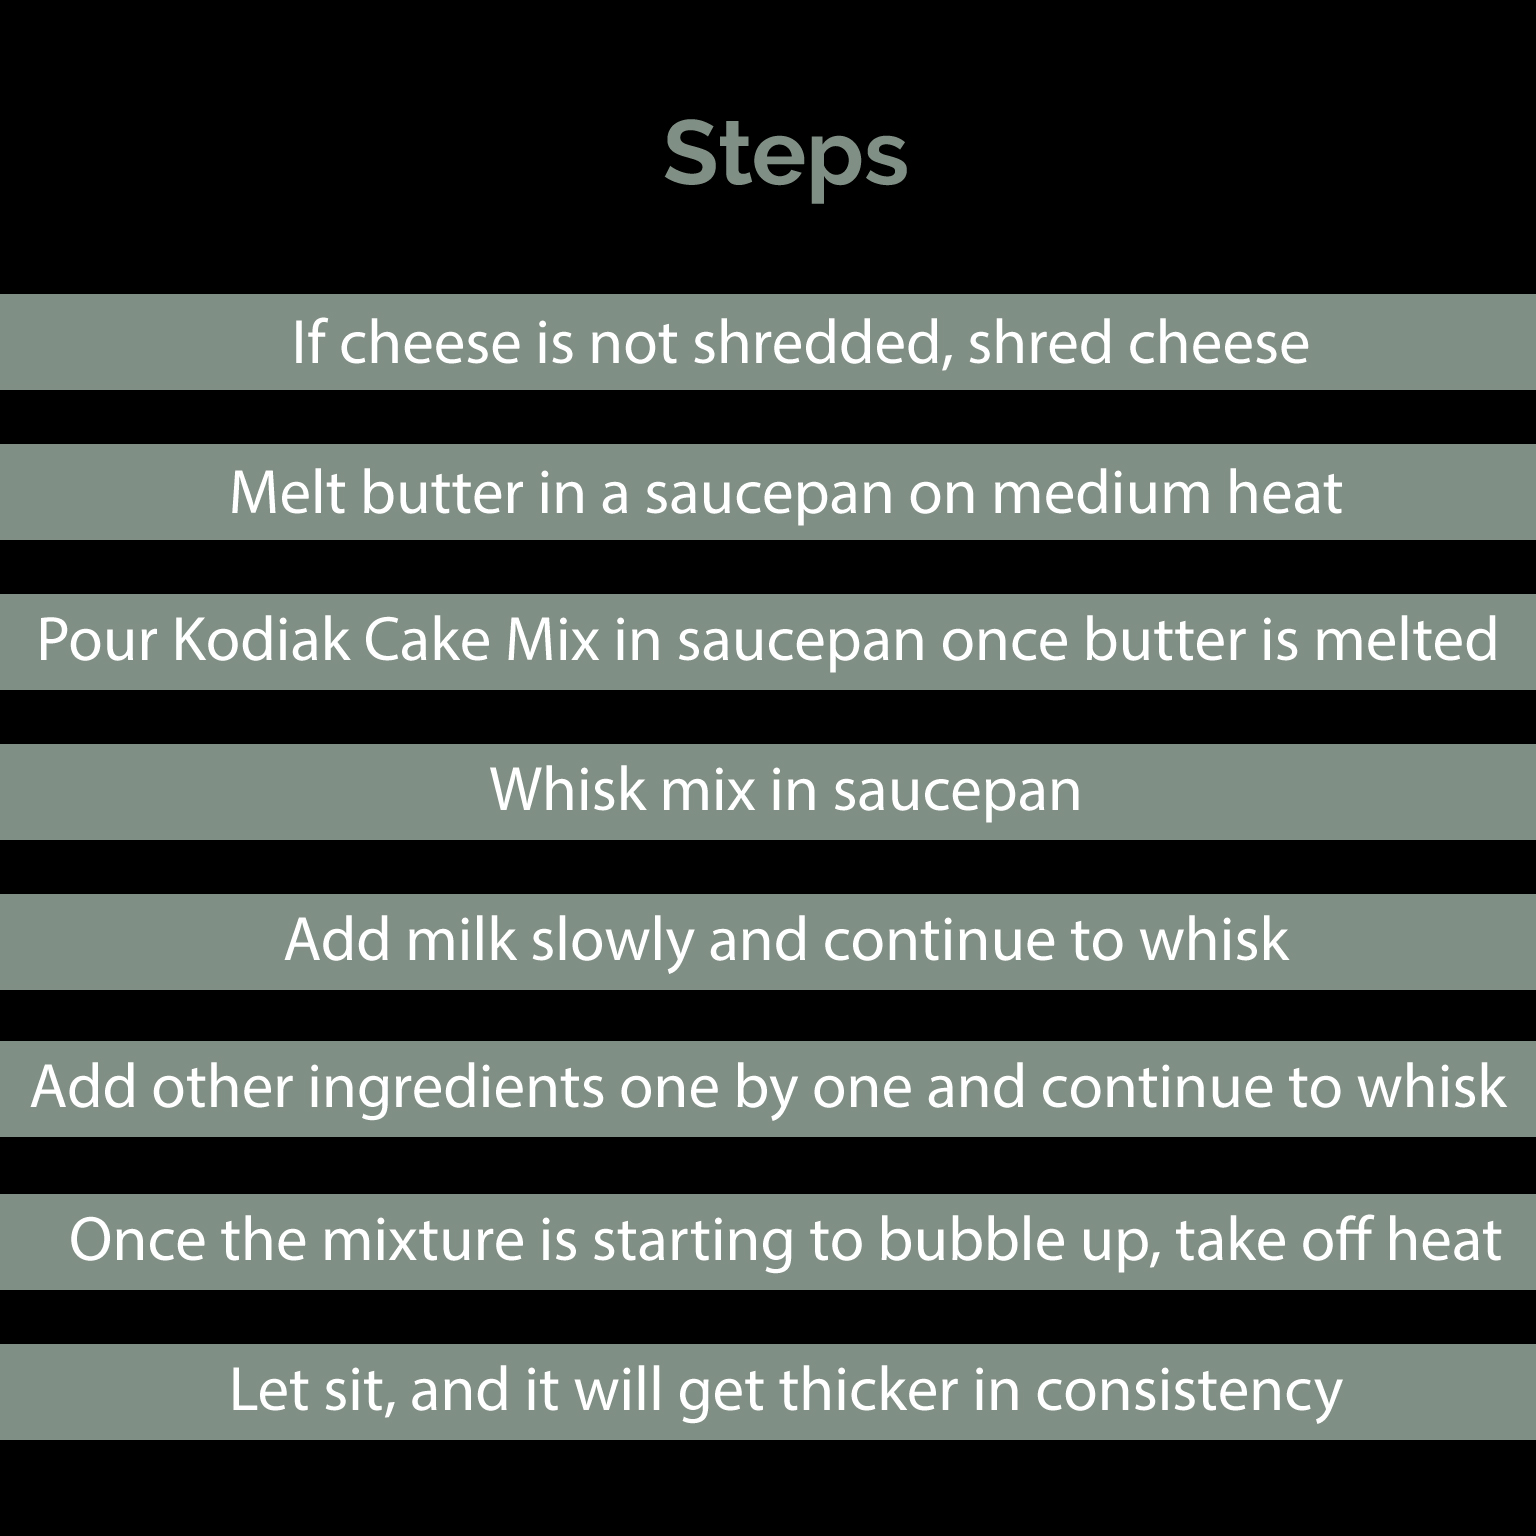
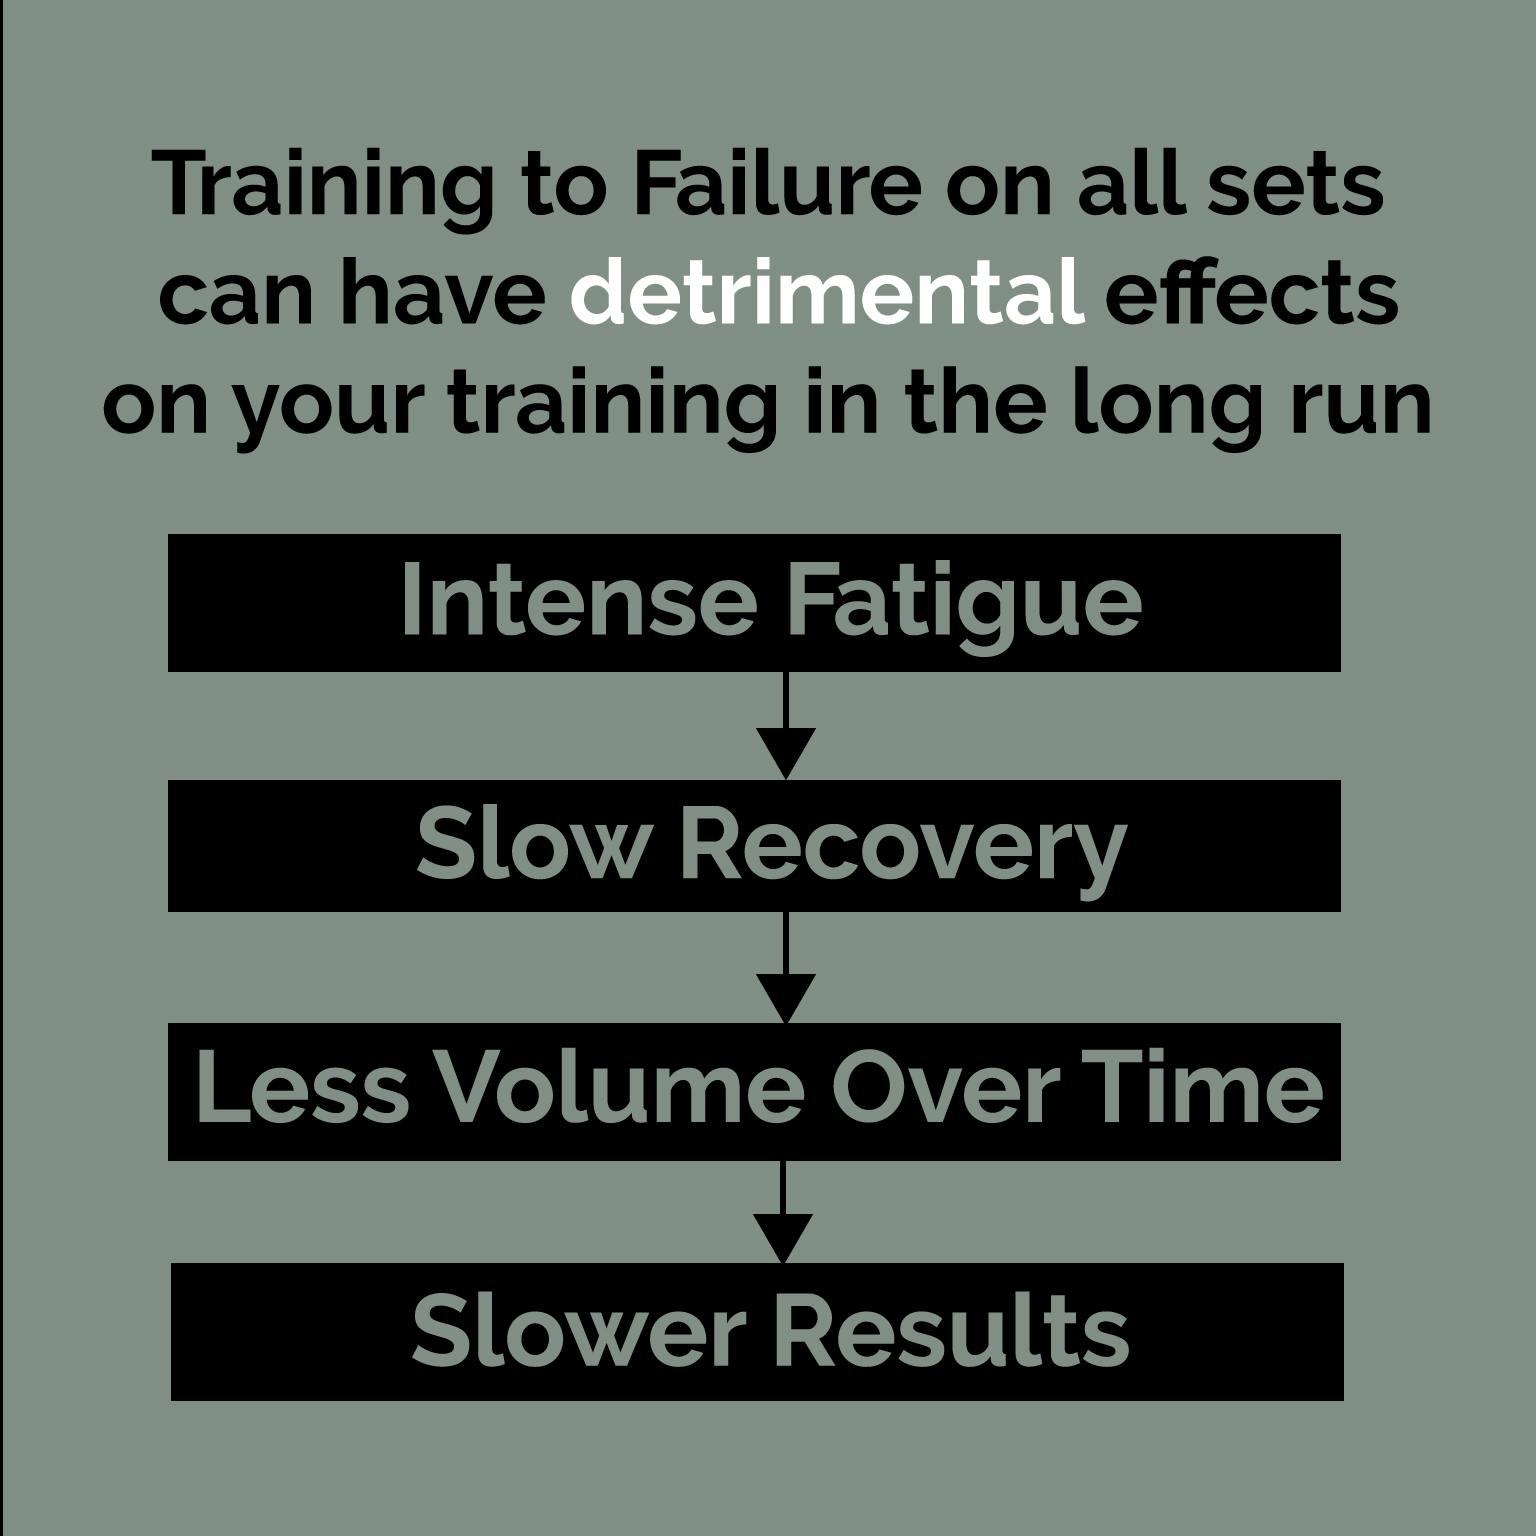
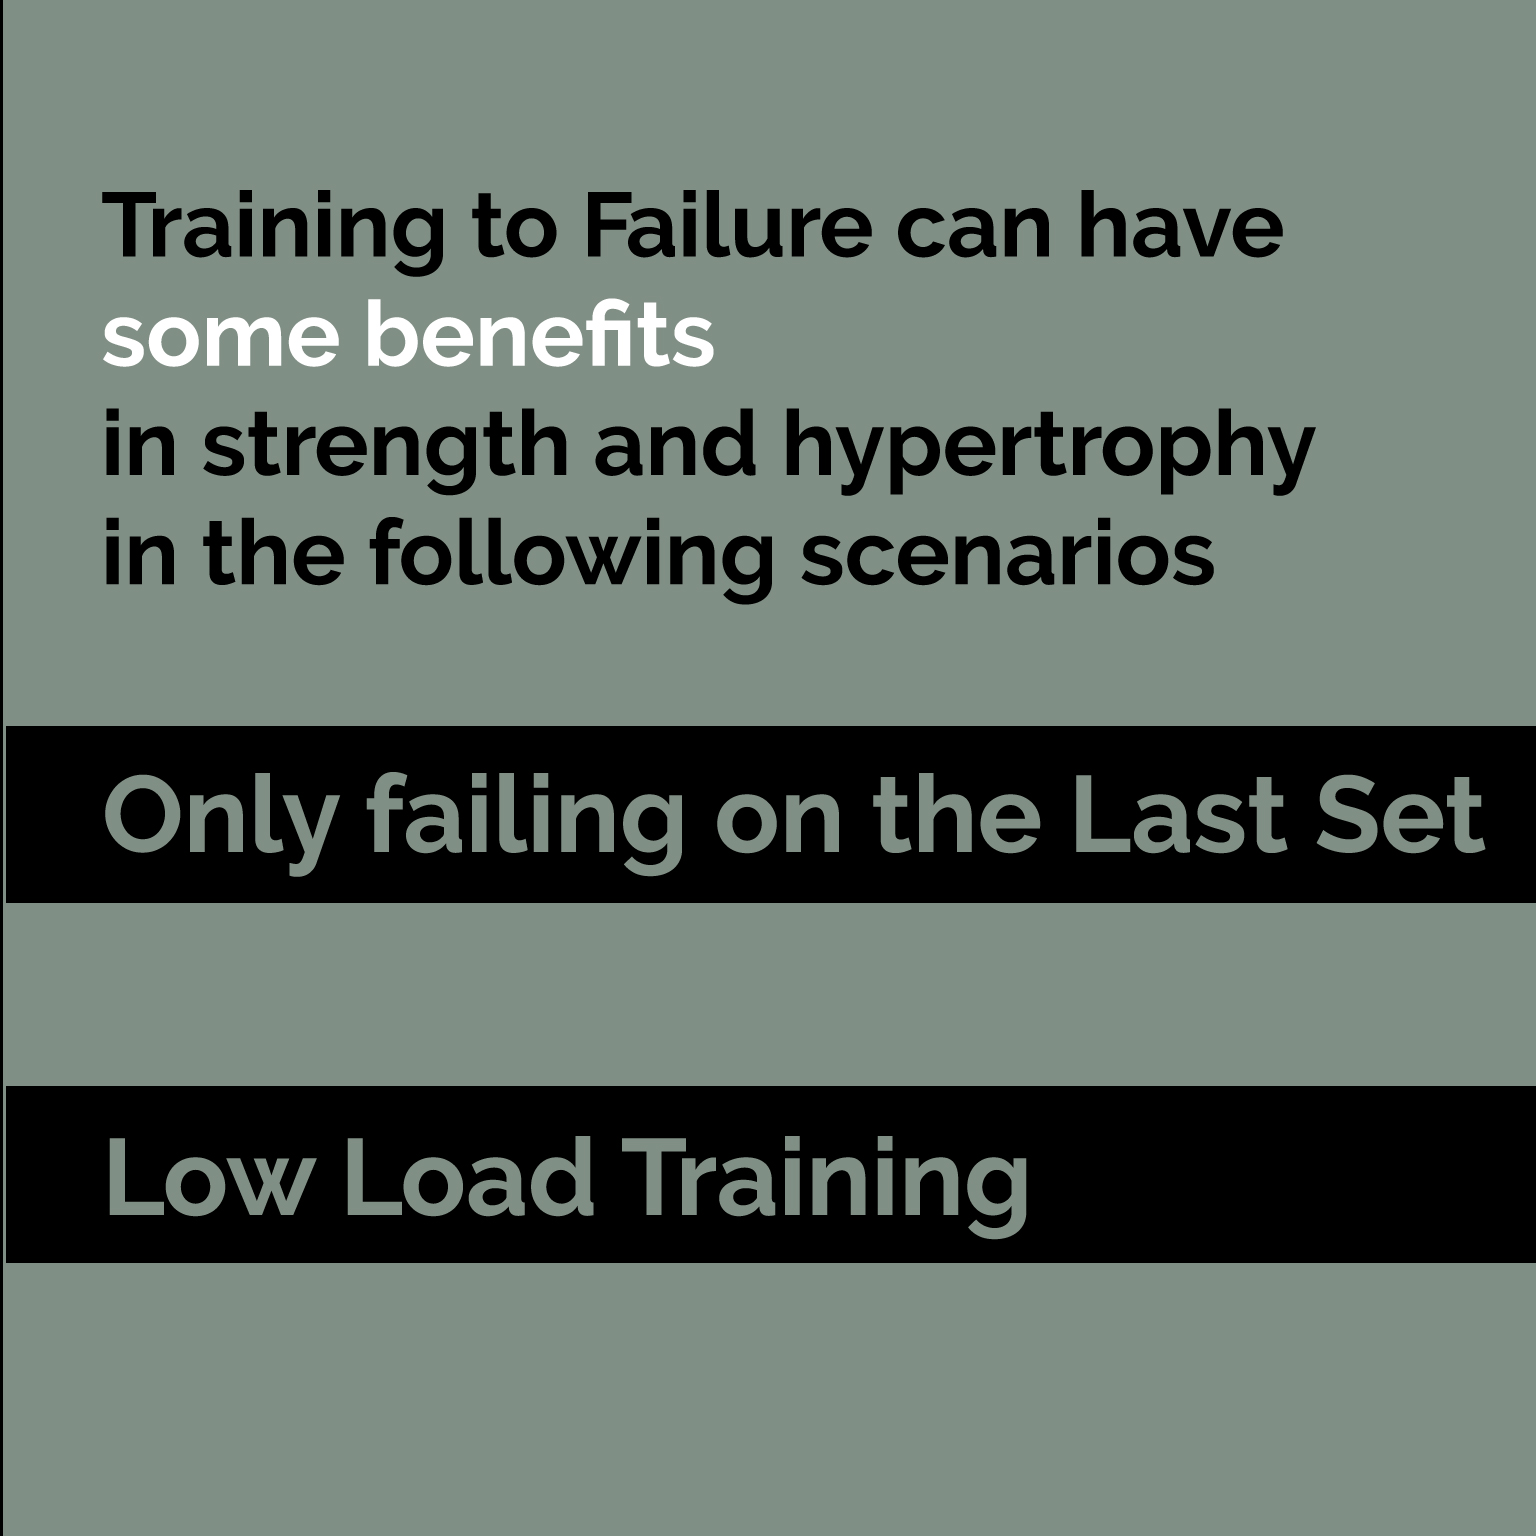
Kettlebells have been all the rage for the past couple of years. You’ll see athletes swinging them 100lb kettlebells and working up a crazy sweat. Honestly, it also usually looks pretty badass too.

What’s makes kettlebells so great though is that they can easily be used for resistance training but also incorporated into circuits. Due to its shape, it’s easier and safer to perform certain moves with a kettlebell than a dumbbell. Like the kettlebell swing. 

Kettlebells swing

We have so many different ways of training though. We can do barbell training, dumbbell training, kettlebell training, etc. So let’s go over why kettlebell training is unique and special in its own way and why you should start incorporating it into your workout routine. 


1. Kettlebells Give you More Exercise Selection

 I think one of the main benefits of kettlebell exercises is that you have a broad selection of exercises to choose from. Even though kettlebells mainly distribute all the weight at the bottom of it, most exercises you even do with dumbbells can be done with kettlebells. Even if you have to slightly modify it a bit more. You can easily do the following exercises with kettlebells that you would normally do with dumbbells:

  •  Curls
  • Tricep Kickbacks
  • Shoulder Press
  • Bench Press
  • Lateral Raise
  • Squat
  • Row

and many more. If you plan on using kettlebells instead of dumbbells, I would suggest looking up form for the specific exercise. Like I mentioned above, since the kettlebell’s weight is mainly distributed at the bottom, there may be more effective ways of doing each exercise with the kettlebell than the form you would use for a dumbbell.  

Some of the more highlighted kettlebell exercises to choose from are:

2. Kettlebells are a Free Form Weight which is Easier to Use and Better for Your Body

Kettlebells are free from weights. So it makes it easier to move around and it’s a non-restrictive exercise. Your body will use more stabilizer muscles to maneuver the weight than something like a machine would. 

As well, since it’s non-restrictive you can move in the way you need to move.  Now, this doesn’t mean you should be swinging with bad form by any means. However, depending on your anthropology, you may need to move weights around a bit differently. Something like machines at the gym doesn’t really let you do that. 

3. Full body workout and ‘Easy’ Cardio and Conditioning 

I say ‘easy’ cardio cause cardio is never easy, but it’s always a huge benefit when you can incorporate cardio and resistance training together. Hence why kettlebells can be very effective. If you look at the kettlebell exercises I pointed out above, you’ll notice plenty of those exercises are full-body exercises. You can easily combine some of those exercises into circuit training and easily get a full-body workout and some cardio in about 30 minutes’ worth of time.  Personally, I find it better to do some type of HIIT resistance training than normal cardio, and kettlebells can easily achieve that. 

4. Kettlebells can Train Muscles you Don’t Normally Train

If you ever wrote a training program for yourself and tried in to get in even the smallest of muscle groups, you’ll notice the list of your exercises grow long and the workout can take hours sometimes. 

What I like about kettlebells, is that due to its expansive exercise selection you can easily choose exercises that help with train muscles you don’t normally train.

An example of this would be the Turkish GetUp as I mentioned above. When I was training a couple of years back, my rotator cuff was fairly weak cause I never properly trained it. I started incorporating exercises of it in my normal workout and it would just be daunting at some point and it would take too long. 

I then incorporated the Turkish GetUp. Since it’s an exercise that helps with rotator cuff stabilization and is a full-body workout, I could easily remove some of the exercises I was doing and just incorporate this. After a couple of weeks of consistently doing it, I started to gain more strength and stabilization in my rotator cuff. However, the best thing was that there were no imbalances either. The Turkish GetUp is easily one of my favorite KettleBell Exercises. 

5. Low Equipment Management and Mobility

At the time of writing this, we’re living in the COVID era. Gyms are actually open but plenty of people aren’t going back due to the high risk. Plenty of people are working out at home. What’s great about kettlebells is they don’t take up a lot of space and you don’t need many of them. You can easily have 2 – 3 kettlebells and be set. Since they don’t take up much space, you can always travel with them too if needed. This gives you an advantage that you can train when needed even when traveling without an issue. (Unless the Kettlebell weighs 200lbs?). 

How to Incorporate into Your Workout

So we know that kettlebells can be extremely beneficial. Not only for its ease of use but it can provide a good full-body workout and you can do some traditional exercises with them too. So how do we incorporate them into your workout? Well, this primarily depends on your goals. However, let’s go over some normal goals and exercises you can incorporate and replace. 

Gaining Muscle

Depending on if you’re already following a hypertrophy program and you’re trying to gain mass, you can easily throw in some kettlebell movements in there as well or use kettlebell movements to replace some exercises. 

Here are some exercises you can replace with kettlebells to help with gaining muscle:

  • Dumbbell Shoulder Press -> Kettlebell Shoulder Press 
    • Better muscle recruitment and easier to perform
  • Goblet Squat -> Kettlebell Goblet Squat
    • Easier to manage, better weight management
  • Standard Lunge -> Kettlebell Overhead Lunge
    • Using more muscles and stability

Cardio

If you’re trying to get more cardio in, then kettlebells can easily be used to do a quick HIIT workout that works up a sweat. 

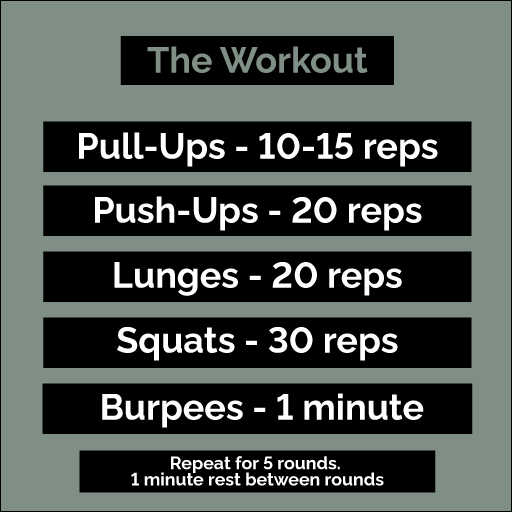
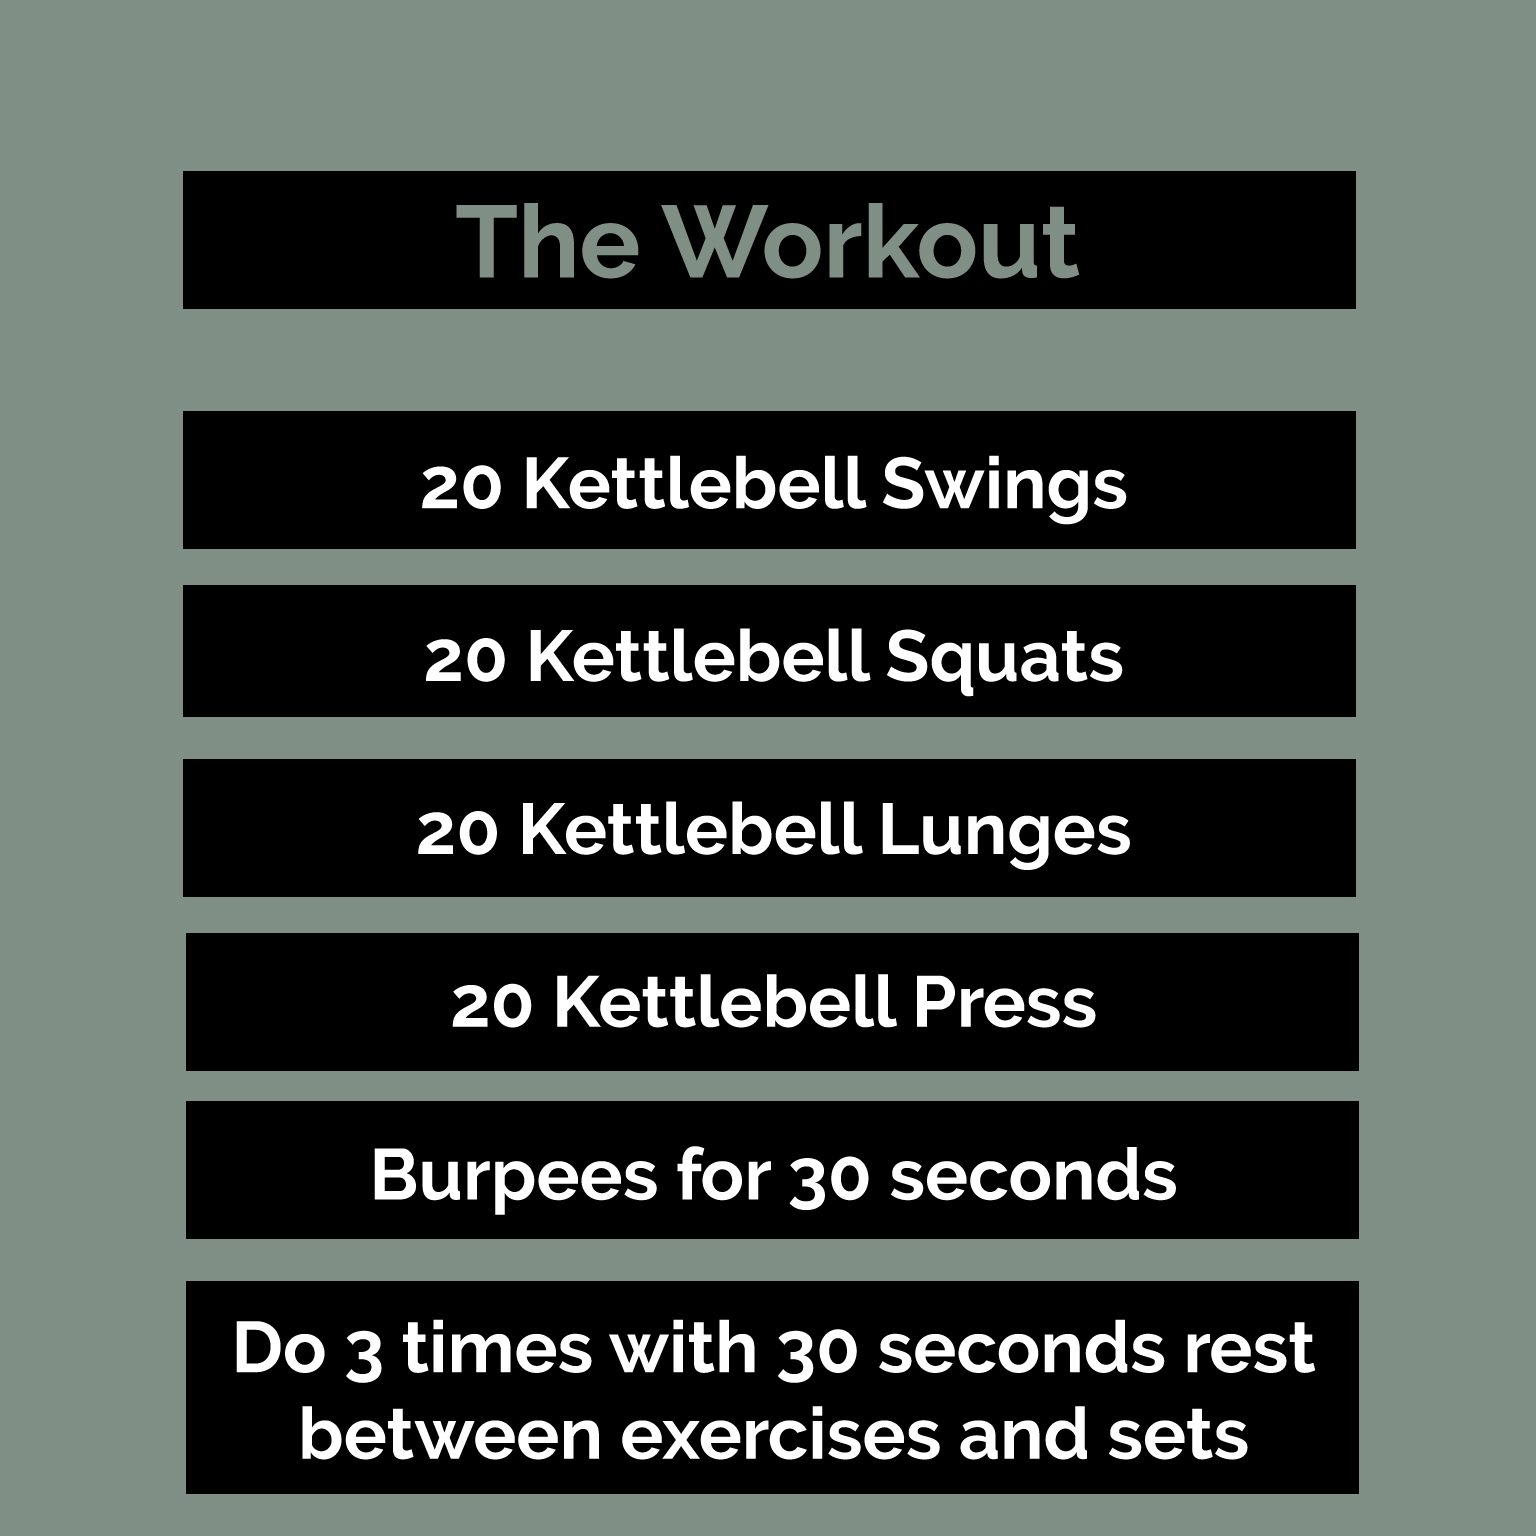
A quick circuit could be something like the following (All exercises with kettlebells):

  • Swings x 20
  • Squats x 20
  • Lunges x 20
  • Shoulder Press x 20
  • Burpees for 30 seconds

Do 3 times and rest 30 seconds in between exercises and sets.

Here is an image version of it if you want to save it:

kettlebells-workout

Even something as simple as that would work up a crazy sweat and provide some good strength gains. 

If you’re curious if cardio can be detrimental to your gains, check out this article

Power and/or Strength Training

Kettlebells can provide benefits to maximal and explosive strength(1).  There are plenty of exercises that can help with this but the main one is the kettlebell swing. When done correctly, it can truly have a huge benefit in your training. I would recommend incorporating it into your program. Maybe on a lighter day though or a day, you normally do cardio. 

Final Thoughts

I believe Kettlebells can be a real benefit to your workout regimen. Whether it be to gain muscle, add additional cardio, or to assist with your power and/or strength training. What makes kettlebells great though is that they’re fairly easy to get and don’t take up too much space. You will be surprised about the benefits you can see once you start incorporating them. Personally, for me, I like to incorporate kettlebells to help with stability and other exercises I don’t tend to do often. I’ve seen improvements in many areas and I have no doubt that if you incorporate them into your routine, you will too.

If you want a kettlebell workout, feel free to send me an email and we can work one out. 

If you want a good kettlebell exercise resource check out Pavel Tsatsouline.

If you’re looking for kettlebells to buy, check out Rogue or Onnit

Note: I’m not affiliated or sponsored by any of these companies. 

If you’re looking for other articles on weight lifting click here.


Joe Rogan Kettlebells | Mma workout, Kettlebell training, Kettlebell


References:

  1. Lake, Jason P.; Lauder, Mike A. Kettlebell Swing Training Improves Maximal and Explosive Strength, Journal of Strength and Conditioning Research: August 2012 – Volume 26 – Issue 8 – p 2228-2233 doi: 10.1519/JSC.0b013e31825c2c9b
  2. Vancini RL, Andrade MS, Rufo-Tavares W, Zimerer C, Nikolaidis PT, de Lira CAB. Kettlebell Exercise as an Alternative to Improve Aerobic Power and Muscle Strength. J Hum Kinet. 2019;66:5-6. Published 2019 Mar 27. doi:10.2478/hukin-2018-0062

Photos:

  • Photo by cottonbro from Pexels
  • https://experiencelife.com/article/break-it-down-the-kettlebell-swing/
  • https://i.pinimg.com/originals/37/92/f2/3792f2554804db1d688e2f44e8210fc9.png

Beer Cheese Dip

I’ll be honest, I’ve only had beer cheese dip for the first time in the last 2-3 years. I had no idea what I was missing out on though!

The warm beer cheese with some pretzels is a great snack to having during October, especially during football season.

I wanted to take a bit of a twist with this recipe and somehow wanted to get more protein in this recipe. So of course, the best option is to use/add Kodiak Cake mix to it. In this case, we’re using the Kodiak Cake Carb Conscious Protein Mix.

Alright, so let’s get down to the ingredients for this. 

Ingredients

  • 3 tbs of Kodiak Cake Carb Conscious Protein Mix (Or replace with flour)
  • 1/4 tsp of salt
  • 1 cup of whole milk
  • 2/3 cup of beer of your choice
  • 2 tablespoons of butter
  • 2 teaspoons of Worchester sauce
  • 1/2 teaspoon Dijon mustard
  • 1/4 teaspoon of cayenne pepper or paprika
  • 1 teaspoon of garlic powder
  • 2 cups of sharp cheddar cheese

If you rather have a quick image you can save, here you go:

beer-cheese-dip

Steps

  • Shred cheese in a bowl
  • Melt butter in a saucepan on medium heat
  • Mix flour and Kodiak Cake mix and pour in once butter is melted
  • Whisk in saucepan
  • Add milk slowly and continue to whisk
  • Add other ingredients one by one and continue to whisk
  • Once the mixture is starting to bubble, you can take off the heat

Again, if you rather have an easy image you can save, here you go:

beer-cheese-dip-steps

Note: The texture will get thicker the longer it sits so don’t feel like you need to keep adding more Kodiak Cake mixture or flour to it. 

beer cheese dip

There you have it! An awesome Beer Cheese Dip that not only you can use as a dip, but as a spread as well. 

You can also refrigerate and heat up again.

If you’re looking for more recipes or another traditional Football snack and that utilizes Kodiak Cakes, click here.

If you’re looking for an amazing pretzel recipe, check out these Soft Pretzel Bites by Jordo’s World! 

Principles to Create the Perfect Diet For You

Principles to create a perfect diet is one of the first steps to create a diet that leads to good health. A good diet can make you feel good, feel energetic, and a feeling as if you can take on the world.   A bad diet can make you feel terrible and even potentially lead to mental health issues. (1

So what’s considered a good diet? More importantly, what’s the perfect diet for you? Is it just calories in and calories out and maintaining a proper body weight? Is it eating “clean foods”? or is it a fad diet that you’ve come upon but haven’t really tried? We’re going to break down the principles of what makes a perfect diet for you and how you can achieve it.

Principle 1 to a Perfect Diet: Calories In and Calories Out

Calories in and calories out is a basic measure of how many calories you’re putting into your body and how much you’re burning off. 

Why is calories in and calories out important? Well, the main purpose of it is to determine if you’re gaining, losing, or maintaining weight. 

Simply, if you intake more calories then you burn, then you will gain weight. If you intake fewer calories then more you burn, you will lose weight. If you intake around the same amount of calories that your burn, you will be maintaining weight (or gaining/losing by a small amount)

I can go into more depth and consideration in an equation like this, but it’s usually broken down as simply as this. 

Figuring out though if you’re trying to gain, lose or maintain weight is important. This will give you a key to how many calories you have to intake. If you don’t know how many calories you have to intake, check out my calorie calculator

For more details on losing weight and gaining weight, check out this article on how to lose weight easily in a step by step process. 

Summary: Figure out how many calories you need to intake to meet your goals. 

Principle 2 to a Perfect Diet: Figuring out Macronutrients

Okay, so you figured out how many calories you need to intake.

Here is where things get fun and the fad diets start to come into play though.

Macronutrients are broken down into the following:

  • Protein (4 calories)
  • Carbohydrates (4 calories)
  • Fat (9 calories)

Macros play a very important part of your nutrition and will dictate the foods you intake. They also play an important part in how your body functions.

Note: I wrote an article stating Why are Macros Important. It goes into more detail about macros then I will be going in this article. So if you wish to find out more, please read that. 

As well, if you already read the article, feel free to scroll down a bit more to see what macro range is perfect for you. 

Protein

Protein is one of the main building blocks in terms of building muscle.

Someone who is doing a vegan diet, may not get the adequate amount of protein they need and will also probably be deficient in some micronutrients. Not having the correct amount of protein, for example, can lead to muscle loss, weakness, and other issues. 

However, someone on a keto diet, who intakes low carbs, high protein, high fat may sometimes intake too much protein. This can also lead to issues like protein being broken down into sugar (taking you out of keto (2)) and can lead to weight gain.

The recommended amount of protein to make sure you’re not in a deficient is 0.8 grams per kg or 0.36 grams per pound. For someone who works out regularly, you want around 1.5-2.0 grams per kg or 0.65-1 gram per pound. (Assuming you’re working out)

So correcting your protein intake is the most important step.

Carbohydrates

Carbohydrates are something else that plays a big role in your bodily functions, especially when it comes to Fiber. 

Someone who’s doing a keto or vegan diet may get a lot of fiber in their diet which is great for them. Someone who’s doing flexible dieting, may not get as much fiber as they really need. 

Fiber can play an important role in your vitals too. Fiber (Soluble) actually binds to cholesterol and sugar which slows down carbohydrate digestion. Fiber also helps with stabilizing your blood sugar levels and protect against heart disease.

A good rule of thumb is to intake 10 grams of fiber per 1000 calories in your intake. So if you’re intaking 2000 calories a day, you should be getting 20 grams of fiber a day. 

Fat

Fat is the macronutrient that gets a bad rep mainly cause of its name. We think fat will make us fat which is not true. We know excess calorie intake will cause weight gain. 

What makes fat dangerous though is that 1 gram of it is worth 9 calories. More then carbs and protein. So it’s a bit easier to go overboard with fat and accidentally intake too many calories. 

Fat isn’t all that bad though, especially when you intake the correct ones. Like monounsaturated and polyunsaturated fats. Healthy fats can also play a part in helping with other vitals as well.

What Macro Range is Perfect for me?

So the question is, what macronutrient range is best for you? Well, it all depends on what’s sustainable for you and your health status. We already stated, having a specific amount of protein is important. So you should know that already. If you need to figure out your protein range (or range of macros in general), check out the macro calculator to get your range.

Now how about fats and carbs? When adjusting your fat and carbs, you should consider the following:

  • Sustainability
  •  Health status

Principle 3 to a Perfect Diet: Sustainability

A sustainable diet is a diet that is easy for you to control your calorie range and not make you fall too short or too high of your calorie goal. To me, sustainability isn’t achievable without having foods that also make you happy as well though. 

I know plenty of people who do keto diets because it’s sustainable for them. They don’t do flexible dieting because they can easily go overboard and eat too much. And you know what? That’s perfect for them.

They like the food they eat, and they manage to be able to easily keep in their calorie range with feeling in control.

For me, flexible dieting is perfect for me. I don’t like limiting my carb intake. If I do keto or something else, I’m not happy with the foods I intake, then I’ll “cheat” on my diet and be mad at myself. That’s not right and will only lead down a slippery slope. 

If your diet is not sustainable, you won’t be happy with it because you won’t be able to follow it and you probably won’t be hitting your calorie range. 

For me, my current macros are:

  • 142g Protein
  • 159g Carbs
  • 100g fat

That’s good for me and easy to hit those goals. However, if I feel like too many carbs allows me to lose control and dip too far out of my calorie range, I can limit it. I can easily adjust it and do the following:

  • 142g Protein
  • 40g Carbs
  • 159g fat

They both lead to 2100+ calories a day and I’ll be maintaining my weight without an issue. 

All calculations are from the macro calculator.

Sustainability should be your main diet goal.

So what’s sustainable for you?

To find that out, you would need to experiment. I would recommend doing something like flexible dieting first and then from there if you find it’s not sustainable for your goals, try limiting certain foods. If that still doesn’t work try going on something on the more extreme side. I think it would be harder to go extreme and then keep adding in food to see what’s sustainable but that’s up for you to decide.

For example, if you’re doing flexible dieting first and you feel that you can’t help but keep indulging on carbs, try limiting your carb intake. You don’t have to be “keto” you can just be in a low carb state and you would readjust your macros and compensate carbs for fat. It may be easier for you now to maintain your calorie range and hit your macro goals while also it being easy for you to follow. 

Health Status

Okay, so we know sustainability is the most important part. However, what happens if you have some type of underlying condition like diabetes or anemia? 

Well, now we have to take that into consideration. If you’re someone who’s diabetic, eating things like carbs can get a bit tricky. Depending on your health you need to adjust your carbs, fat, and protein in a way that benefits you. 

I believe also knowing your family history should be something you take into consideration. Maybe you’re someone who’s prone to being diabetic or have high cholesterol. So maybe you need to be limiting carbs, intaking more fiber, and/or more healthy fats than other people. 

Note: It may take some time to figure out what is sustainable for you. So don’t be upset at yourself if it takes some time to figure out. Keeping adding or eliminating food and play around with your macronutrients in a way that you know is healthy and sustainable. As well, if you do have any history of health issues or underlying conditions, please consult your doctor about what foods can benefit you. 

Principle 4 to a Perfect Diet: Micronutrients

Anyone who’s remotely into fitness takes some type of multivitamin and thinks they’re all good. Which in some cases, they are. However, this isn’t always the case.

I believe micronutrients is one of the underrated factors of your diet. For example, if you’re a vegan you could potentially be anemic and not be intaking enough iron. 

I think the first step is to go get a test on your micronutrients. See if you’re deficient in anything. If you’re deficient in anything, try getting your diet to add more of that micronutrient(s) to your system. 

You can also be too sufficient in a micronutrient and you may need to take out that micronutrient from your system.  For example, I’m too sufficient in Vitamin B12. Most multivitamins are stacked with vitamin B12. so knowing that I’m not taking my multivitamin anymore.  I try to personally get most of my micronutrients from food rather then multivitamins unless I’m truly deficient in it.  

I think Health Status is important here as well. Trying to get micronutrients that benefit you and what you’re lacking is important. For example, if you’re anemic you’ll need more iron in your diet. So you may need to intake more liver or an iron supplement. Maybe you’re deficient in vitamin D (Which a lot of people are and multivitamins don’t have that much) you may need to take a vitamin D supplement or just get out more often. 

You want to find what you need and don’t need it. Take out what is useless for you and put in what’s good for you. Dieting in the end all comes down to a balance. 

Principle 5 to a Perfect Diet: A Balancing and a Lifestyle

A perfect diet should consist of balancing calories, macronutrients, micronutrients in a way that is sustainable for you. A diet is more of a lifestyle rather than something you do every couple of months. Your diet should make you happy with the foods that you eat but not make you go overboard in any category that can leads to future issues down the line.  If that is to be a more extreme diet like Keto, that’s okay as long as it’s sustainable for you and you’re meeting your macronutrients and your micronutrients don’t take a beat in any way. A perfect diet will also make you feel like even if you “cheat” on it, it’s okay. You know you’ll get back on it the next day because it’s sustainable. 

Final Thoughts

This article covers a lot but also not enough. Look out for future articles detailing different ways to improve your diet. As well, you can find out more on some of the other topics by checking out the articles I wrote on calorie intake and macronutrients.

There is no perfect diet for all of us. The perfect diet only exists on an individual level. 

You may have expected this article to go into foods that will overall benefit you, which it doesn’t. This article mainly goes into the principles of creating a perfect diet and my idea of a perfect diet. Be on the lookout though for future articles detail foods that can usually improve your overall health. 

A quote from Bruce Lee that I believe sums up the perfect diet is this: “Absorb what is useful, reject what is useless, add what is essentially your own”.

Put things into your diet that benefits you. Reject what you don’t need. Add in things that are essentially your own and make you happy. 

Bruce Lee and Me - THE LIFE DESIGN PROJECT | Bruce lee quotes, Bruce lee,  Martial arts

References

  1. Li Y, Lv MR, Wei YJ, Sun L, Zhang JX, Zhang HG, Li B. Dietary patterns and depression risk: A meta-analysis. Psychiatry Res. 2017 Jul;253:373-382. doi: 10.1016/j.psychres.2017.04.020. Epub 2017 Apr 11. PMID: 28431261.
  2. Masood W, Annamaraju P, Uppaluri KR. Ketogenic Diet. [Updated 2020 Jun 22]. In: StatPearls [Internet]. Treasure Island (FL): StatPearls Publishing; 2020 Jan-. Available from: https://www.ncbi.nlm.nih.gov/books/NBK499830/


Photos:

  • Photo by Ylanite Koppens from Pexels
  • https://i.pinimg.com/originals/e0/33/55/e03355774c802e6b94d0a85596f5206e.jpg

Does Training to Failure Have Any Benefits?

Training to failure gets talked about a lot when in the gym and I’m sure plenty of people practice or try it to some degree throughout their training career. The problem is, plenty of people do it and assume it works because they have a pump and they’re fatigued. 

However, does it really belong in your training regimen and can it provide any true benefits to you?

What is Training to Failure?

Training to failure, in principle is to perform a set/exercise to absolute failure. Meaning you can’t muster another repetition. In this post, we’ll be talking about training to failure in regards to training a set of an exercise to failure. 

Does Training to Failure have any Benefits?

Like I mentioned earlier, this method of training may seem effective as it’s something that provides usually a fairly good pump and you’re fairly fatigued after the exercise is completed. 

Interestingly enough, training to failure (Especially in compound movements) doesn’t really provide much of a benefit in many regards.  Let’s go on to why this is the case though

Training to Failure Leads to Intense Fatigue

When training to failure, you’re bound to fatigue yourself fairly fast especially during compound movements. The problem with intense fatigue caused by training to failure is that it will start to carry over much further into training sessions. More fatigue that gets carried into other training sessions, the more likely you won’t be able to perform as well, and the chances you won’t be making the progress you desire(1).

Even though fatigue usually seems good in terms of working out, that’s not always necessarily the case. Fatigue that gets carried over from workout to workout and you’re not recovering in time can be detrimental and cause regression of progress in your training.

With this regression, it can either lead to overtraining or possibly even injury. Now just to clarify, fatigue from working out is necessary and normal. The problem is that training to failure will cause intense fatigue and you may not recover in time for another training session.

So, does this mean you shouldn’t workout hard? Definitely not. But you shouldn’t be burning yourself out either every workout. If you do feel like you’re overtraining and not recovering in time, you may need to take a deload week

Volume Doesn’t Seem to Increase When Training to Failure

If the volume is something you take into consideration with your training program, then you would be inclined to know that training to failure doesn’t really impact volume(2). In some cases, it can even lead to less volume in the whole workout. This again is due to the high fatigue level you can endure from training to failure sessions.

You would usually be better off trying to lift a bit heavier and back off 2-3 reps shy of failure. You would have more effort to exert in more sets and would equate to possibly more volume. 

Just to note: overtraining, fatigue, and regression in volume through a training program will not give you the results you want. 

training-to-failure-info

Is There a Good Time to Train to Failure?

Okay, I know from the above you would probably want to steer clear of training to failure. However, there could be some places where it’s useful. 

Here are a couple of scenarios where it could be useful:

Low Load / Low Weight Training

A study has shown that a group that trained with lower loads to failure had greater hypertrophy (gains) and in strength endurance than a group of low load training to almost failure. However, according to the study, it wasn’t really that significant(3).

Failure on the Last Set

Failing on the last set is probably going to be your best option if you do try to train to failure.  The positive outcome of this is that not all of your sets are going to fail and you should be able to maintain volume without an issue.

If I had to recommend though, I would stick to doing it though on isometric exercises. I do feel that if you’re training to failure on compound movements, there is always a possibility of increased danger of injuring yourself.  

taining-info-2

Final Thoughts

I don’t think training to failure has much room inside your regimen and isn’t worth the time and effort. From what most research has shown, it only seems to cause negative effects in a training program. Leading to excess fatigue that will lead to lower volume overall is never a good thing.

However, there are times you can implement it into your training like failing on the last set and low load training. If you’re doing lower load training, I would recommend just doing BFR Training then.  So if you’ve been doing this method of training, consider tossing it or setting it aside for just your last set. Set more time for recovery or use more weight for sets that you would train to failure. 

References

  1. Morán-Navarro R, Pérez CE, Mora-Rodríguez R, de la Cruz-Sánchez E, González-Badillo JJ, Sánchez-Medina L, Pallarés JG. Time course of recovery following resistance training leading or not to failure. European journal of applied physiology. 2017 Dec 1;117(12):2387-99.
  2. Santos WD, Vieira CA, Bottaro M, Nunes VA, Ramirez-Campillo R, Steele J, Fisher JP, Gentil P. Resistance Training Performed to Failure or Not to Failure Results in Similar Total Volume, but With Different Fatigue and Discomfort Levels. Journal of strength and conditioning research. 2019 Jan.
  3. Terada K; Kikuchi N; Burt D; Voisin S; Nakazato K. Low-Load Resistance Training to Volitional Failure Induces Muscle Hypertrophy Similar to Volume-Matched, Velocity FatigueJ Strength Cond Res. 2020. doi: 10.1519/JSC.0000000000003690

Photos:

BBQ Apricot Wings

It’s that time of year and football is back! There is no better way of celebrating football than having some good ole BBQ Wings. 

For this recipe though, we’re going to be doing something a little bit different and using Kodiak Cakes corn mix and Kodiak Cakes Apricot Syrup to make BBQ Apricot Wings.

I know, syrup + wings don’t sound like a great combination. However, this recipe doesn’t make them come out sweet at all, and if anything gives a little bit of tang to it. 

As well, the Kodiak Cakes Corn Mix adds a bit more protein and fiber then you would normally find in flour. With 8 grams of protein per serving and 2 grams of fiber per serving. (1/4 cup is serving and this recipe calls for 1/2 cup so 16g of protein and 4g of fiber)

Ingredients

bbq apricot wings

The ingredients for this recipe is fairly straight forward for the most part:

  • Wings
  • 1/2 cup Kodiak Cake Cornbread mix (can replace with 1/2 cup of flour making it 1 whole cup of flour)
  • 1/2 cup of Flour
  • 1tsp of pepper
  • 1tsp of salt
  • 1tsp of chili powder
  • 1 tsp of garlic powder
  • 1/2 cup of bbq sauce
  • 1tbs of hot sauce
  • 1tbs of Kodiak Cakes Apricot Syrup (or more if you want)

Directions

  1. Preheat oven (425) or air fryer (390)
  2. Mix flour, Kodiak Cake Cornbread mix, and other spices together in a bowl
  3.  Dry wings with a paper towel
  4. Coat wings in spice/flour mix and remove any excess flour by shaking off
  5. Once the oven or air fryer is preheated, place wings in
  6. Then mix BBQ Sauce, hot sauce, and Kodiak Cakes Apricot Syrup in a separate bowl
  7. Let wings cook for 25 min (oven) or 15 (air fryer) or until internal temperature reaches 165 degrees
  8. Now, take wings out 
  9. Coat wings in mixed sauce
  10. OPTIONAL You can place wings back in the oven or air fryer for a couple more minutes
  11. Take them out and enjoy!

wings

You’re all set to have your BBQ Apricot Wings just in time for football season!

If you want more recipes look no further.

Go Panthers!

panthers


How to Keep Fit During a Pandemic

Keeping Fit During a Pandemic

As sad as it is to see, we’re in very unprecedented times. COVID-19 has unexpectantly struck the world and has left us very vulnerable. Many people are sadly losing their lives and getting sick. Others are left at home alone. In times like this, it’s easy to fall down a slippery slope and get into bad habits. For some though, we’re coming to a realization that we can use this time to build better habits and achieve goals we couldn’t before. Some goals might be to stay fit or get fit during this pandemic.

Take Advantage of These Times

While COVID-19 is striking us, a good amount of people are thankfully healthy and under stay at home orders. It’s easy to use this time to not do much and sit around. Maybe play some animal crossing or create a new Tik Tok?  However, there is no other time like it to start accomplishing goals you couldn’t have before. You’ll see a lot of people write off “getting fit” due to gyms being shut down. (I can’t lie, I’m MISSING being able to deadlift and squat) The thing is, you don’t need a gym to get into shape. Realistically, all you need is your body and the floor you’re on. 

No Gym, No Problem

Gyms are great due to the amount of cardio equipment they have how many different actives you’re able to do. Unless you have a home gym, you probably can’t do much besides some calisthenics and resistance band training. Guess what though? That’s more than enough! We’re going to go through some quick exercises that can end up being a good 30-minute workout and burn about 250-300 calories. 

Home Gym Equipment for You

Let’s go through a comprehensive list of items we can get that can help you achieve your fitness goals at home.

Pull Up Bar

The pull-up bar is one of the most essential home items you can have. Pull-ups target your back and can target your biceps depending on which variation you do. It will also provide a bit of a core workout for you. You have a pull-up bar and you can have an amazing tough workout in front of you. Pulls ups for me was one of the essential movements to growing a bigger back. It’s a great foundational exercise that can lead to many benefits.

What happens if you can’t do a pull-up? Well, you can always modify it. You can either put a chair underneath you can do the pull up that way or you can attach a resistance band around the pull bar and around your foot to do it. 

Great thing is, most pull-up bars now in days can also be used as a push-up bar. Some of them you may be able to do dips on! It’s a win-win situation. Just before buying one, consider the havoc you might put on your door frame.

Resistance Bands / Dumbbells

I remember when I first got into training, and I use to do at home workouts like P90X and all I had was a resistance band. I didn’t put on a ton of muscle, but it got the job done. Granted, mine had a resistance of max 30lbs and it was the only one I had. What does make resistance bands so great is how easy it is to add resistance and the fact they’re fairly affordable. Most exercises you do with dumbbells you can do with resistance bands too. You can easily do curls, shoulder presses, tricep kickbacks, an alternative to pull-ups, rows, and more exercises with resistance bands. Just be careful with them, it’s easy to not tie them well and then have them smash you in the face. 

Now in my opinion, if I have the option I’ll usually choose dumbbells. Unless I’m doing an exercise for tension or some type of physical therapy, I would usually choose dumbbells. So if they’re accessible to you, I would suggest getting them. If money is a factor then resistance bands is the way to go! You can find many sources online that give you different resistance band training which I will link a couple of here.

Mat

A mat is always good to have in your house if you’re exercising. One option to pick up is to do some yoga. Many people are doing online yoga classes via Instagram live and you can always join one. Besides a mat, the only other option you may need is some yoga blocks but they’re not needed. Yoga is a good way to increase your flexibility and core strength. It will definitely burn a good amount of calories and can help you relax. Here is a good source of a beginner’s yoga video. 

Your Body

Well if you’re missing your body, you got yourself a bigger issue… I also don’t know how you would be reading this. Anyways, if for some reason you don’t have access to any of the following resources your body is the ultimate provider of resistance and can be used at your main tool to stay fit. You can easily configure a HIT workout with no weights and easily burn 200-300 calories in 20 minutes. Here’ a quick example of a total body HIT workout:

  • Squats – 1 min
  • Alternate Leg Lunges – 1 min
  • Push-ups – 1 min
  • Burpees – 1 min 
  • Jumping Jacks – 1 min

Repeat this in a “Ladder” fashion. After you do a minute of each exercise. Take a 20 – 30-second break and then do all the same exercises for 50 seconds, then 40 seconds, and so on until you finish 10-second increments. You should work your way up to about 15-20 minutes and you’ll get a quick total body workout in. 

Quick Workout with Equipment

So let’s say you do have some equipment at home. You have a pull-up bar, you have some resistance bands, etc. Now what?

Let’s go through a quick total body circuit you can go through.

First, do a warm-up for 10-15 minutes. 

Now let’s try doing the following:

Pandemic Workout

Repeat for 5 rounds. 1-minute rest between rounds. 

For those looking for a little bit more, you can try the following:

  • Pull-Ups – 10-15 reps  (assisted if needed)
  • Push-Ups – 20 reps (assisted if needed)
  • Shoulder Press – 15 reps
  • Bicep Curls – 15 reps
  • 30-second rest
  • Tricep Kickbacks – 15 reps
  • Rows – 15 reps
  • Lunges – 20 reps
  • Squats – 30 reps
  • Burpees – 1 minute

Repeat for 5 rounds. 1-minute rest between rounds. 

Work on Your Weaknesses

One of the things I struggle with the most is mobility and flexibility. Ever since I was a kid, I always lacked any form of flexibility. I figured since I can’t stick to my normal gym routine, I’m going to start focusing on things I lack. In this case, it’s my flexibility and mobility. One of the additional things I’m trying to do is also fix my posture since I’m on my computer all day.  Additionally, I’m also trying to do more core exercises. I don’t do as much core as I use to when I was younger so it’s something that I’m trying to get back into. 

What are your weaknesses? Figure them out and try making a plan to fix those issues if it doesn’t require a gym. 

Final Thoughts

I hope that you’re not experiencing the rough side of this pandemic. If you’re not and you’re safely home, this is a good time to start getting better. You probably have more time to work on yourself. Come out of this pandemic mentally and physically stronger than before. Stay fit and stick with your goals. Don’t let the pandemic win and debilitate you. 

Photo by cottonbro from Pexels

Do the Murph Challenge this Memorial Day

Do the Murph this Memorial Day Weekend

The Murph Challenge is a HIT workout to do every Memorial Day. It’s an excruciating workout that will kick your ass and humble you.

You’re probably asking though, what is the Murph and why should I do it?

About Lt. Michael P. Murphy and why we do the Murph Challenge

Lt. Michael P. Murphy was a Navy Seal who made the ultimate sacrifice for his teammates during Operation Redwings. Lt. Murphy heroically sacrificed his life for his teammates to save in a dire situation. Michael Murphy is a hero. Not many people are will to do that to save their teammates. It takes a very special person. We do the Murph to honor him and keep him in our memories. 

Michael Murphy

If you want to read up more on this mission and Michael Murphy in general you can check out the book called “Lone Survivor” by Marcus Luttrell. There is also a movie out about it starring Mark Wahlberg playing Marcus Luttrel and Taylor Kitsch portraying Michael Murphy. 

Foundation

You can officially register for the workout via on their official website

Once registered, you can select an item of purchase and that money goes straight to the LT. Michael P. Murphy Memorial Scholarship Foundation. You can find more details out about its here 

The Murph Challenge Workout

So what is the workout?

Well, the workout consists of the following:

It’s not easy whatsoever, but if you have a pull-up bar, you should give this workout your time and dedication even if you don’t have a weighted vest. 

Final Thoughts

I do the MURPH every year now. It never gets easier, but somehow my times get better. Go figure. If you want a tip, break the workout into 10 sets of:

  • 10 pull-ups
  • 20 push-ups
  • 30 squats

Do the mile run before and the mile run after. You’ll be surprised at your time and that you were able to get through it. If you do the Murph, post your time up in the here.

Post your time also on social media and spread the word on The Murph Challenge and the story of Lt. Michael Murphy. 

If you did the Murph and you feel like your cardio isn’t great, see if an elevation mask would benefit you. 

Image sources: https://special-ops.org/https://en.wikipedia.org/wiki/Michael_P._Murphy

Are Deload Weeks Necessary?

Most workout regimens last about 12 weeks or 3 months worth of time. In that time frame (depending on how hard you’re training), your body is going through a lot of physical stress. If you continue without any breaks, you may eventually start doing damage to your body. You won’t be able to lift as much weight or get the great results that you usually would. This is why most workout programs include a deload/rest week. Some programs incorporate time off while others lower weight and require continued gym compliance. Let’s go over the proper way to take a deload week and what would work best for you.

WHAT IS A DELOAD WEEK?

A deload week (also known as taper week or unload week) is time off from your normal workout regimen. The goal of a deload week is to allow your body to rest and recover, with the aim to lower the potential risk of injury and overtraining. A deload week is not a rest week. You aren’t taking 100% of your time off from working out. You will still be exercising but at a lower volume (Read “How to go about a deload week” to understand what volume is). Essentially, if you’re doing weight lifting, you want to lower your normal weight down to about 40% for lifts during this period of time.

WHEN TO IMPLEMENT A DELOAD WEEK?

FOLLOWING A PROGRAM

If you’re following a specific training program, then that program may already have a deload/taper scheduled into it. If this is not the case, then a rule of thumb is to take a deload week every 4-6 weeks. Usually when you’re doing a training program, your 4th or 5th week is your “peak” week. Your volume may have increased by a large margin. After this peak week, you would want to do a deload week.

NOT FOLLOWING A PROGRAM

If you’re not following a strict program, I would recommend paying attention to your training outputs and patterns of increases, decreases or a plateau of strength. If you’re seeing increases in strength and continue to do so, by all means continue on with your workout plan. However, once you start to realize that you may be plateauing, losing strength, or even getting injured more often you need to take a deload week. I want to reiterate though, after 4-6 weeks you should take a deload week. You will lower your risk of getting injured and plateauing.

VOLUME AND HOW TO GO ABOUT A DELOAD WEEK.

The whole point of deloading is to lighten the load/volume compared to your ordinary training routine. Studies have shown that decreasing your normal volume by 40 – 60% is key. Volume is the amount of weight you lift multiplied by the amount of reps, then taking that number and multiplying it by how many sets you did. For example. If I deadlifted 225lbs for 6 reps of 3 sets I would do the following equation : 3 * (225 * 6). (Sets * (Weight * reps)). This would be equivalent to 4050 lbs. So if you were deloading and decreasing by 40% of that you would do 4050 * 0.40 (Volume * Deload_Percentage) which would equal 1620lbs. It’s important to note that you have a few way of going about hitting that desired volume.

You can do one of the following:

  • The same weight with less reps/sets
  • Less weight with the same reps/sets.
  • A mixture of both.

Each is outlined below.

SAME WEIGHT WITH LESS REPS/SETS

So if you were trying to reach a total volume of 1620 lbs and trying to lift the same weight with less reps/sets our workout would look something like this:

  • 225lbs for 7 reps for 1 set
  • 225lbs for 4 reps for 2 sets
  • 225lbs for 2 sets for 4 sets

You can choose either one of those and you’re looking at around 1500-1800 lbs volume which is around the percentage we are trying to hit.

SAME REPS WITH LESS WEIGHT

Now if you were trying to do lighter weight for the same reps and sets, your option would be 90 lb – 100 lbs for 6 reps for 3 sets.

MIXTURE OF LESS WEIGHT AND LESS REPS/SETS

If you wanted to do a mixture of the both you can have something like:

  • 185 lbs for 4 reps for 1 – 2 sets
  • 165 lbs for 5 reps for 2 sets
  • 150 lbs for 6 reps for 2 sets

Out of the 3 options, I usually recommend either a mixture of less reps/sets and less weight or same reps with less weight. However this depends on the individual and how you’re feeling. Since I always feel like you’re at a higher risk of getting injured if you’re training heavy, during my deload week I like to keep the reps/sets the same and lighten up the weight.


FINAL THOUGHTS

Deload weeks are a great tool to incorporate into your workout routine. You should try to implement them every 4-6 weeks or after a “peak week”. It’s important to note again, this is not an excuse to just not workout. You will still be working out, but just at a lower volume/frequency. Doing so can lead to greater benefits in your training, minimize a plateau, minimize risk or injury and more. If you haven’t implemented a deload week before, try it and take note on how you feel after your deload week.

References

BOSQUET, L., MONTPETIT, J., & ARVISAIS, D. (2007, August). Effects of Tapering on Performance: A Meta-Analysis : Medicine & Science in Sports & Exercise. Retrieved April 02, 2018, from https://journals.lww.com/acsm-msse/fulltext/2007/08000/Effects_of_Tapering_on_Performance__A.19.aspx

Do Elevation Masks Improve Your Cardio?

I’m sure in some way or form you’ve seen the elevation mask or otherwise known as the Bane mask. You’ll see athletes use them while preparing in the offseason, you’ll see fighters use them preparing for a big fight, you’ll even hear the average gym bro sometimes wearing it during a cardio session and sounding a bit like Darth Vader. It seems like whoever wears one is training HARD but does it actually improve your endurance and cardio in the long run?

What Are Altitude Training and Elevation Masks?

An elevation mask is a piece of equipment you buy to alter yourself to become Bane. Okay… not really, but its purpose is to simulate altitude training. When training at a higher altitude, the amount starts to decrease, and essentially, there isn’t as much air to breathe. When you’re in a high altitude state (8000 ft+) your body has to start compensating for the lack of oxygen that’s being produced. One way your body does this is by creating more red blood cells. More red blood cells in the body mean that your body has an easier time delivering oxygen throughout your body. The point of the elevation mask is to simulate altitude training because unfortunately, we all can’t just train in the Himalayas. T elevation mask doesn’t actually simulate the high altitude pressure, it just reduces the amount of air you’re intaking. Most elevation masks have “resistance valves” which valves allow you to select the intensity/altitude.

Effects Of The Elevation Mask

When using an elevation mask, the person is hoping to achieve better endurance, and achieve a higher V02 max. A VO2 max is the maximum amount of oxygen that a person can use when training/exercising. With the more oxygen you’re able to intake, the more energy you’ll have for greater endurance when you’re working out. The elevation mask may not exactly simulate a high altitude, but it does help improve your VO2 max and other parts of your cardiovascular strength. According to a study published in 2016, people who used an elevation mask showed improvements in VO2, ventilatory thresholdpower output, and respiratory compensation threshold. It’s important to note that with an elevation mask, you will see improvements in these areas but it’s not a direct replication of altitude training, and if done improperly you may not see results at all.

How to Train with an Elevation Mask

One of the main benefits of actual high altitude training is that you’re living in that environment for a long period of time. When using an elevation mask, you’re only getting about an hour of that same exposure. To see real benefits from an elevation mask, you would need to train with it frequently since your training session will only be about one-two hours max. I would recommend training with the elevation mask for at least a total of 3 – 4 hours a week to see benefits.

If you happen to purchase the training mask 2.0, you’ll notice your package comes with resistance caps. The resistance caps indicate the intensity. It’s suggested that if you train with the resistance mask frequently you should increase intensity (or change the resistance caps) about every 4-6 weeks to improve performance and avoid a plateau.

Final Thoughts

Training masks can be a great tool to improve your performance and cardiovascular strength. The key is frequent training with it though. It may seem like a scam of sorts because it doesn’t actually simulate high altitude training, but using the mask can still provide benefits that would be harder to achieve without the training mask.  You can purchase one at trainingmask.com or on amazon. Soon you’ll be doing crazy things like this :

Bane Mask

Note: The above link is an affiliate link.


Want to know if cardio is detrimental to your gains? Check out this article

References

Porcari JP, Probst L, Forrester K, et al. Effect of Wearing the Elevation Training Mask on Aerobic Capacity, Lung Function, and Hematological Variables. Journal of Sports Science & Medicine. 2016;15(2):379-386.

Zisko N, Stensvold D, Hordnes-Slagsvold K, et al. Effect of Change in VO2max on Daily Total Energy Expenditure in a Cohort of Norwegian Men: A Randomized Pilot Study. The Open Cardiovascular Medicine Journal. 2015;9:50-57. doi:10.2174/1874192401509010050.

Exercises to Fix Your Posture

When people look at you, one of the first things they notice is your posture. Your posture can either give off the impression of someone who is confident and in charge or someone who is weak and a loser. It leaves a strong first impression on other people. For some people, good posture may be as simple putting their shoulders back and standing up straight. However, doing certain exercises can help you naturally improve your posture.

WHAT CAUSES BAD POSTURE

In today’s age it’s very easy for our posture to become quite poor. We are always staring down at our phones or we are hunched over on our computer all day. Our bodies will start to naturally fall into that position from doing these things on a daily basis, it’s bound to happen that our posture will start to suffer. Naturally, other things can contribute to poor posture as well, but from the causes mentioned here, daily stretches and exercises can minimize bad posture and promote natural good posture!

ROUNDED SHOULDERS

Our back/shoulders naturally start to take a more round shape when we look down at our phones and computers all day. Even though rounded shoulders and bad posture can easily be from our daily routine it can also be caused by muscular imbalances such as tight/overpowered chest and weak shoulders/back area.

Image from http://www.strengthsensei.com

TESTING

We’ll perform a quick test that will determine if we have rounded shoulders or not. The first test to perform is the “pencil test”. To perform this test follow these steps:

  1. In each hand hold a pencil (pen or any stick for that matter)
  2. Relax both arms as if you’re just standing like your normally would.
  3. Note your hand position.

If the pencil is facing forward / thumbs point forward, then you pass the test! However, if the pencils are facing inward / the back of your hands are pointing forward then you have rounded shoulders.


SOLUTION

If you have rounded shoulders it can be because of a tight chest, weak back, or a product of daily activities. In your workout routine, I would recommend including deadlifts, dumbbells, or machine rows. These exercises are more back dominant and can drastically improve your posture overall. You can also include some stretches to fix this issue as well.

Wall Angels
Requirements: A wall!
How to:

  1. Place your back up against a wall with your butt against the wall as well.
  2. Hold your hands up against the wall with your elbows and and back of your hand touching the wall. (As if a cop told you to put your hands up)
  3. While keeping your elbows and hands against the wall, bring your arms all the way up
  4. Bring your arms now back to the starting position and then repeat.

Do this for about 10 – 15 reps. I would also recommend doing this a 3 – 6 seconds up and 3 – 6 seconds down.


T Stretch
Requirements: Resistance Band

How to:

  1. Take a resistance band and hold it in both hands in front of you shoulder width apart and your thumbs pointing up.
  2. From there, slowly stretch the band out in front of you. With your thumbs pointing back. (Make sure you really feel the back of your shoulders contracting).
  3. Slowly retract back to the starting position and repeat

Do this for about 30 reps.

For both of these stretches, I would recommend incorporating them into your morning and night routine, and if you have time, during the afternoon. These moves need to be done consistently to get real success.

ANTERIOR PELVIC TILT/FORWARD HIP

Anterior pelvic tilt, or forward hips, are the shortening of the hip flexors and the lengthening of the hip extensors. This problem is caused by sedentary lifestyle and can lead to other annoying issues down the line. Even though you should be able to easily look into a mirror and be able to tell if you have anterior pelvic tilt, you can do the Thomas Test.

TESTING

You can have someone help you perform the Thomas Test, I recommend getting a physical therapist to test you but you can also do a self assessment on yourself.

Requirements: An elevated, flat surface (table).
Steps to perform:

  1. Lay down on the flat surface with your legs hanging off the edge.
  2. Pull one leg up to your chest.

If the opposing lower thigh (the leg you’re not pulling to your chest) does not touch the table then you have anterior pelvic tilt. Again, I do recommend getting a physical therapist to perform the test on you.

SOLUTION

Half Kneeling Hip Flexor Stretch
How to:

  1. Place your right knee on the ground.
  2. Place your left leg at a 90 degree angle in front of you.
  3. Push your hips forward and hold this stretch for 30 seconds.
  4. Switch leg positions and repeat.


Bridge
How to:

  1. Lay on your back with your legs bent, feet flat on the floor, your hands by your side.
  2. Elevate your hips up until your body has formed a straight line with no bending inwards on your hips.
  3. Hold for about 10 – 15 seconds

Repeat this exercise for about 8 – 12 reps.


Clam
Requirements: Resistance Band
How to:

  1. Place resistance band above your knees.
  2. Lay on your side with your knees bent at a 45 degree in front of you.
  3. Keeping your knees at a 45 degree angle, lift and rotate your top leg in an “opening” fashion, all the way until your knee is pointing up.
  4. Bring your knee back down

Perform 20-30 reps on both sides

.


FINAL THOUGHTS

Having better posture is not only good for confidence but it’s good for our health and can help us avoid injuries. Rounded shoulders and anterior pelvic tilt are some of the more common things people deal with in terms of having bad posture. Doing compound movements like squats and deadlifts can help with the issues listed above, however, to really conquer these issues, stretching needs to be included to target specific muscle groups not engaged in other exercises. For best results, incorporate these moves into your daily routine. Try to do them at least 2 times a day.